Trying To Make Homemade Ube Ice Cream
- Lara Vaidya
- Jul 31, 2020
- 4 min read

One of my favorite locations to get soft serve from is Somi Somi; Korean-inspired Soft Serve & Taiyaki (a goldfish-shaped waffle cone). Their flavors and texture of the ice cream are amazing, and I recommend checking out the stores for a sweet treat. The first flavor I tried was their Ube flavor, a mild, earthy flavor that is surprisingly good. I have been obsessed with the Ube flavor and wanted to try making Ube ice cream at home. With it being my first time making custard-based ice cream, I didn't expect the ice cream to turn out perfectly the first time, in addition to adding the purple sweet potato to the ice cream. This is a documentation of how I tried to make Ube ice cream, but it sadly did not come out to the Somi Somi taste. You can check out the recipe I used and the process of what I did, but there are many changes to this recipe that I will have to make if I decide to try Ube ice cream again. If you see anything I could improve on to get a good result, let me know in the comments so I can try it out.
There are two main components to this Ube ice cream; the ice cream base and the Ube. Ube is like a purple yam and is popular in Filipino cuisines. You can get fresh Ube, frozen grated Ube, Ube powder, and Ube extract. I was able to find fresh Ube from an online supermarket ad decided to go with that choice, thinking it would be the most natural form of Ube to use in the ice cream. This was the first error I made. While the produce that arrived looked purple and yam-shaped, the taste of the ice cream, in the end, made it clear that it was not Ube or at least wasn't used in the proper way to get the flavor in the ice cream. The ice cream had a distinct sweet potato taste and smell, making me think that the Ube was actually a purple sweet potato and not the distinct root vegetable I had grown to like from Somi Somi. Clearly, getting the fresh produce form of Ube introduced some uncertainty of whether or not it was actually real Ube. If I were to make Ube ice cream in the future, I would definitely purchase the extract or powder to ensure I am getting enough of the right flavor.
Moving on from the Ube, there is the ice cream base that is made using a custard. I have made custards before so I felt comfortable with the process and decided to make the egg-yolk base for my ice cream. Below are the ingredients I used to make the custard-base.

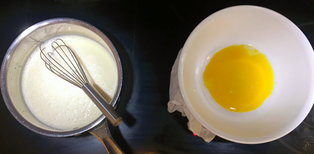
To prepare the Ube, I boiled the root in water, peeled off the skin, and grated the Ube. Taking the heavy cream, milk, and sugar to a saucepan, heat up the mixture until it is simmering, but not boiling. Use a whisk to make sure the milk and heavy cream are not burning and the sugar is fully dissolved. Once everything is simmering, bring the egg yolks nearby and turn the heat on low. Slowly add the milk mixture to the egg yolks, initially adding drops and then incorporating ladlefuls. While you add the mixture with one hand, constantly stir the egg yolks with the other hand to prevent them from scrambling. This process is known as tempering and is used to cook the egg yolks. Constantly whisking and slowly incorporating the hot milk mixture will ensure you don't get scrambled eggs. Another trick to stabilize the bowl is to place a wet towel underneath the bowl.


Once half the milk mixture has been tempered into the eggs, pour the egg mixture into the saucepan and continue to mix on low. This is the continuation of tempering the eggs, making sure they are fully cooked and getting the mixture to slightly thicken, whisking constantly to prevent egg bits from forming. You can tell if the mixture is ready if it is a thicker liquid and can coat the back of a spoon, as shown below.

From here, I mixed in the cooked and grated Ube with the custard base and placed in an airtight container to chill. A mistake I made here was putting the custard base in the freezer and not the fridge, which caused it to harden up. I was able to take the custard out of the freezer and place it in the fridge in time before it was completely solid, not affecting the overall taste, but this could have led to icy ice cream if left longer. The difference between the fridge and the freezer is that the freezer will cause ice crystals to form and the ice cream to lose creaminess. Placing it in the fridge will chill it to churn it, but keep its creaminess.


The color of the custard did look pleasing at this point, but it fooled me into thinking the ice cream was going to taste as I remembered it. After the base is chilling for about 4 hours, or up to overnight, churn the ice cream using your method of choice. I used the Kitchen Aid Stand Mixer Attachment, which was the ice cream bowl and the paddle. Once the ice cream looks like soft serve, pour into a container, and freeze for four hours. At this point, I scooped a nice scoop of the purple-ish ice cream and tasted it, immediately regretting it. The ice cream, while it was a nice and creamy texture, did not taste anything like the Ube ice cream I had tried before. As mentioned, it had a sweet potato taste that was unappetizing, and the batch of ice cream was left in the freezer to throw away. I speculate that my inexperience in making ice cream and the actual Ube flavor contributed to the bad ice cream, as I had a few errors in the process and ultimately didn't use the correct form of Ube. In the future, I will be spending more time researching where to get the real flavors and paying attention to where I put the ice cream base. It was a good experience to practice tempering and to explore new flavors I haven't tried before. I look forward to getting the proper flavors and trying this recipe again.


Comments