Embroidery Sampler
- Lara Vaidya
- Jul 24, 2020
- 9 min read

Updated: Jul 27, 2020
Embroidering is a new craft I decided to try after finding a pack of colorful embroidery thread lying around the house. It's a fun way to add simple and intricate designs to any fabric, and can be used is a variety of ways. Embroidering a name on towels or clothing, adding a flower wreath, or creating a patch are some of my favorite applications for embroidering. Before getting started with any project, learning the basic skills are crucial to making sure you can complete your project properly. In the world of embroidering, the embroidery sampler is the best way to practice the different stitches and create and guide to reference to when embroidering bigger pieces. There are many different styles and ways to create a sampler, which can be seen below.


The right one is from Adventures In Making, and the left one is a sampler you can get from Etsy. Both are great examples of some embroidery samplers you can try out, with the Etsy one having more types of stitches and the heart one giving a neat look to the sampler. For my sampler, I decided to take a more beginner route as it was my first time embroidering and designed my own sampler with the basic stitches.

Here I use 14 stitches that I learned and practiced before combining them on this sampler. Using the colorful embroidery thread, I was able to create a nice visual to show the different stitches.
Running Stich
The running stitch was the easiest stich for me to learn because of its simplicity and versatility. The stitch is a type of line stich as you make lines with the thread.


The stitch is fairly simple to complete. Simply go up through the fabric to the front side, move the needle forward to create a space, and go down through the fabric to the back side. Then move the needle again to make another space and go up again to to the front side. Repeating the up and down motion will give you the segments of thread in a line on your fabric. Another way to speed up the process is to use the needle to go up and down through the fabric without pulling the embroidery thread through. The up and down motion is created, and you can pull the thread once the needed can't get through anymore. This is known as a rocking move and is used in more complex stitch to achieve the different types of stitches. The complex stitches are made up of the running stitch, so knowing how to quickly use the running stitch is important.
Field Running Stitch
The field stitch uses two different threads to create a design on top of the existing design. Here, we use the running stitch as a base, and then come back with another thread.


With the running stitch laid down in one color, you can take a new thread of another color and start to weave between the running stitch. Come up right at the first stitch of the running stitch, then move the needle under the first running stitch, then under the next stitch, until you reach the last running stitch. The field element comes from the second thread weaving through the running stitch. You can create some nice border elements and add texture to your pieces when you use the field stitch.
Backstitch
The backstitch is how you achieve the filled-in straight line. Using the same technique as the running stitch, the backstitch is a great way to draw lines in your piece.


The motion of moving the needle looks complicated at first, but understanding the idea of how the stitch works makes it easier. The start of the stitch is similar to the running stitch; come up through the fabric, go down a little ahead, and then come up a little ahead. Instead of continuing that pattern, we are going to go backwards one stitch. When you first come up through the fabric, there is a space the you will go back onto, so the needle goes back through the hole. Then you skip two spaces and come up again to the fabric, moving backwards again to continue the stitches. The move two spaces go back one space is how the backstitch is done. Practicing the stitch will help you get used to the motion and helps to get the same size stitches all the way through.
Couching
While it may sound weird at first, couching is a great stitch to add more textures and dimensions to your piece. The use of two different threads at once can be complicated and takes practice to get the right look.


There are two threads in this stitch that we will be using. The pink thread is a thicker thread that get "couched down" or wrapped around by the tan thread. Since the tan thread is doing all the couching, the pink thread is not constantly going up and down through the thread. The tan thread starts a little forward of the pink thread, and the stitch shown above moves from right to left. With the pink thread off to the side, you go back down with the tan thread in the same hole you can up, looping around the pink thread to wrap to around and secure it. Then you use the tan thread to come up a little ahead again and make the same loop around the pink thread. This is down all the way down to the end of the pink thread, and the result is a pink thread couched down by the tan thread. For an advanced look, you can spilt the pink thread and create two paths, couching them separately.
Straight Stitch
While the name doesn't explain the stitch, the straight stitch is a way to make a small star design in your piece. It uses a few running stitches in a circular pattern to create the star shape.


The stitch is a repetition of a few motions; start by coming up the fabric to make the end on one of your points in the star, then go down to make the middle part. Continue coming up at the next point and going down in the middle all the way around until you finish the star. You can make them upside down, closer together, father apart, or go make a half star as shown above. They are a fun and easy stitch to add some designs to the fabric.
Satin Stitch
The satin stitch is how patches of embroidering are done, creating the filled-in effect to your fabric. It can be used to make an object such as a character or flower of interest and then filling them in with different colors to make it look like a painting.


Here, the satin stitch is used to color in the purple oval with a dark blue thread. Use the backstitch to create the outline for the shape you are doing. Taking another or the same thread, make lines from the ends of the shape, going up and over from one side of the shape to another, and then back down. By going across the entire shape, you can create a filled in look to the embroidery piece.
Blanket Stitch
The blanket stitch looks like a complicated stitch, and does take some precision to get right, but can be used in many ways to make a fabric piece look nice. It's often used on the ends of fabric, like blankets, to get a finished look, but the stitches on their own make for a nice design.


The motion for the stitch is hard to see in an image and easier to try out yourself. You are going to start off by taking the thread up through the fabric, and then the needle is going to go down and rock back up to the fabric, reaching the first place you came up. Here, you don't want to pull the thread through all the way. Drawing a line is helpful to make sure your blanket stitch is in a straight line. When you rock your needle, it should come back to the line. Move the thread around the needle, and then pull the needle through. This creates a right angle, and the line of the blanket stitch. While it does sound complicated, looking at videos of it being done and trying it out yourself will help you figure it out. Some variations are a staircase look, which involves changing the distance the needle rocks down and up.
Chain Stitch
The chain stitch is like a textured version of the backstitch, providing some dimensional to your fabric. It can be used as a border and even to make the lazy daisy stitch.


Similarly to the blanket stitch, you don't want to pull the thread all the way through as you start each chain in the chain stitch. Come up through the fabric, create a loop with the thread, and then rock down and up from the same hole you started with. Make sure the thread is behind the needle, and pull the needle all the way through. This creates the looped shape, and you can continue with the motion to create a change of loops. The rocking motion after you loop the thread is what creates the chain, and the needle comes up inside the loop to secure it and move onto the next chain.
Lazy Daisy Stitch
The lazy daisy stitch is an extension of the chain stitch, creating the chain in a circular motion.


This stitch is a great way to make a simple flower, and you can add a French knot in the middle to complete the flower look. When you make the first chain, you're going to want to go over the loop to secure it down, as you are not continuing in a straight line. After, you are going to come back up net to the first stitch you made, angling the next chain to create another flower petal. Going all the way around creates the lazy daisy chain stitch.
Feather Stitch
The feather stitch can be seen as an extension of the blanket stitch.


For this stitch, you want to make sure you are not pulling the thread all the way through during the stitch, as you want to be able to move the thread around. Start by coming all the way through the fabric, and then creating a curve or a U-turn shape. Rock the needle slightly off from the first hole, shown to the right and up in the picture. Rock up and go over the thread that is curved, which secures the thread down. To create the feather look, repeat the same stitch on the left side, curving the fabric to the left. Alternating the sides will give the look of the stitch shown above, but you can also go three to the right and three to the left.
Coral Stitch
The coral stitch is a combination stitch that uses the French knot with a backstitch.


Come up the fabric all the way, and then curve the fabric into a c-shape. Using a line with dots, rock the needle down and up on the first dot, keeping the top of the c-shape on top of the needle. Move the bottom of the c-shape under the needle and pull through to create the line with a knot. Continue this stitch all the way down the line, following the dots for the placement of the knots. This stitch is another great design for a border or to add texture to a line.
Spiderweb Stitch
The spiderweb stitch is like a field stitch; it uses the existing stitch to create dimension on the fabric by weaving through the threads.


You start by making a straight stitch all the way around, creating the base for the spiderweb. It is important that the number of points on the star is odd, so here there are 5 points to the star. Taking a new thread, which can be thicker and a different color, you come up through the middle of the star and start weaving. The pattern for weaving through the start legs is over-under over-under over. While the start doesn't matter, you can go over one thread, under the other, over, under, and over. Since there are an odd number of star points, the next start for the weaving circle is under, and the pattern repeats until the thread runs out.
French Knot
The French knot is a way to make a bundle of thread that creates texture and can serve in many kinds of designs.
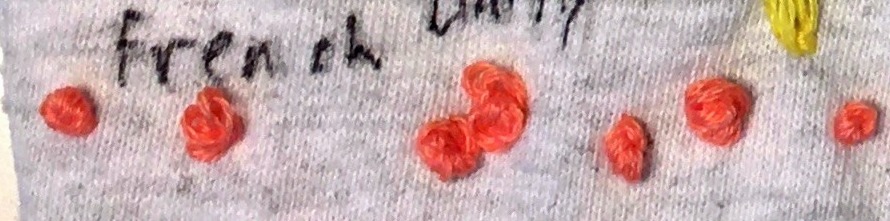


The knot requires precision in where the thread is, as it ensures the knot is secured once the knot if creates. Start by coming up the fabric and looping the thread by placing the needle behind the thread and wrapping the thread 3-4 times, depending on how big you want the knot to be. Tilt the needle and go back down through the same hole to finish up the knot. I personally like the use of the French knot to make flower buds, but it can be used for mossy textures or to create an interesting border.
Bullion Knot
This knot is similar to the French knot as it a longer version of the compact French knot.


Come up through the fabric, and then rock the needle down and up to the original hole, making sure not to pull the thread all the way through. With the eye of the thread poking out and the pointy part at the top, wrap the thread from behind around the top of the needle. The amount of thread wrapped should be the same length as the distance created by the rocking motion. Pull the needle all the way through, using your finger to pinch the coils in place, and pull to tighten the knot. To finish the knot, go back down to the hold at the bottom and the knot is secured. The knot can be made to be popped up like a bridge and can be used as sprinkles for a donut.
Those are the fourteen stitches displayed on my embroidery sampler! After practicing these stitches, you can easily use them on different embroidery designs and pieces. With a guide to show you the variety of stitches you can use, completing more complicates pieces will be easier. I loved the use of different colors for each of the stitches to make a colorful reference that I can use in the future. Try out this embroidery sampler and let me know how it turns out!


Comments